

Sending a print ready file to a printer doesn’t need to be complicated. Follow these steps and your job will arrive ready to print — no back-and-forth, no delays, no surprises.
STEP 1 Use the right file format
STEP 2 Set your resolution to 300 DPI
STEP 3 Set your color mode to CMYK
STEP 4 Add bleed — if your design goes to the edges
STEP 5 Embed your fonts
STEP 6 Check your file before you send it
STEP 7 Send your print-ready file
STEP 1 Use the right file format
The file format is the single most important decision you make to have a print-ready file. Get this right and everything else is easier.
✓ Send a PDF. A high-resolution PDF is the standard for professional printing. It locks in your fonts, colors, and layout exactly as you designed them.
| ✓ Accepted formats PDF/X-1a or PDF/X-4 High-resolution PDF (press quality) PDF Print (Canva) | ✕ Avoid these Word documents (.docx) PowerPoint files (.pptx) Low-resolution JPEGs or PNGs |
STEP 2 Set your resolution to 300 DPI
DPI stands for dots per inch. It’s a measure of image sharpness. The higher the DPI, the crisper the print. Low resolution is considered 72 DPI – 150 DPI.
| 72 DPI Screen only Will print blurry | 150 DPI Marginal Acceptable for some uses | 300 DPI Professional print Always use this |
For print, your images need to be 300 DPI or higher. A quick rule of thumb: photos taken on a modern smartphone are usually high enough resolution. Photos downloaded from websites or pulled from Google Image Search are almost always too low — typically 72 DPI — and will print blurry. When in doubt, if the image file is under 500KB it is likely screen resolution, not print resolution.
! Quick Tip: Zoom in to 300% on your image in your design program. If it looks blurry on screen at that zoom level, it will print blurry.
STEP 3 Set your color mode to CMYK
Printers use four ink colors to produce every shade — Cyan, Magenta, Yellow, and Black. This is called CMYK. Computer screens use RGB (Red, Green, Blue). If you send an RGB file, colors may shift when printed.
| ✓ Before you export: In your design program, go to Document Setup or Color Settings and confirm the color mode is set to CMYK before you create your PDF. |
Powerpoint, Microsoft Word: These default to RGB. Save as a PDF. File → Save As → PDF
Canva: Chose PDF Print.In PDF Print, under “Color Profile,” choose CMYK.
A good commercial printer will check your file for CMYK in its pre-printing process.
STEP 4 Add bleed — if your design goes to the edges
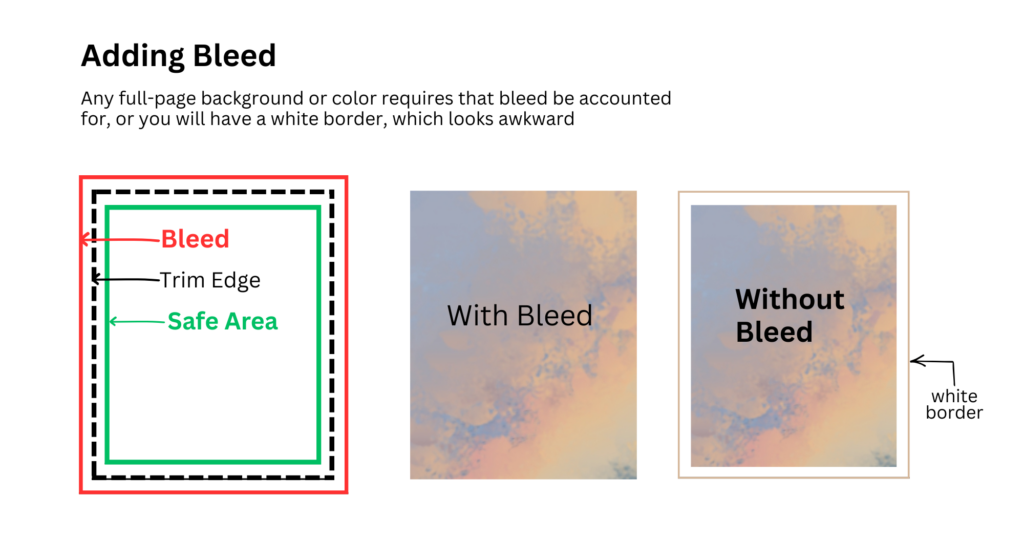
If any color, image, or design element is across the entire page, or crosses an edge of a page, you need to add bleed to your print-ready file. Bleed is an extension of your artwork beyond the trim edge, so that when the page is trimmed after printing there are no white borders. If your design has a white background and nothing touches the edges, you likely do not need it.
| Standard bleed amount: 0.125 inches (1/8″) on all four sides | Safe zone for text and logos: Keep all important content 0.125″ inside the trim edge |
Canva: Chose PDF Print.In PDF Print, choose ‘Crop marks and bleed.’
STEP 5 Embed your fonts
Fonts are like custom software — the printer’s computer needs to have the font you chose in your design installed to reproduce your design correctly. Embedding fonts packages them inside your PDF so they travel with the file.
Properly exported PDFs usually prevent the issue, however if you used specialty or unusual fonts, your printer will check this also prior to printing and flag any issues.
| ✓ When saving your PDF: Look for an option that says ‘Embed All Fonts’ or ‘Subset Fonts.’ In Adobe Acrobat, Illustrator, or InDesign this is found in the PDF export settings. Always turn this on. |
Using Canva? Fonts are embedded automatically when you export as PDF Print — no additional step needed.
STEP 6 Check your file before you send it
Spend five minutes on this checklist before hitting send. It prevents the most common reasons print jobs are delayed.
———-
File is a PDF PDF/X-1a or PDF/X-4 preferred
Resolution is 300 DPI or higher for all images
Color mode is CMYK not RGB
Bleed is included if design elements run to the edge
Fonts are embedded in the PDF (save file as PDF)
Trim size is correct double-check final dimensions
No important content is too close to the edge stay 0.125″ inside the trim
File name is clear example: MetroPresort_Postcard_5x7_Front_v2.pdf
———-
STEP 7 Send your print-ready file
Metro Presort accepts files via email for smaller jobs and secure file transfer for large files.
Include in your email:
→ Your name and company
→ Final trim size (e.g. 4″ x 6″ postcard)
→ Quantity needed
→ Paper or substrate preference if you have one
→ Delivery date needed
→ Any special finishing — folding, perforation, coating
We have created a downloadable resource sheet with all of these tips so you can send correctly formated files every time.
Not sure if your file is ready? Just ask.
Metro Presort reviews files before we print. If something needs adjusting, we will let you know before it costs you time or money. Contact Us!